How to Fix SharePoint 2013 Slow Performance

You may have noticed that the hardware requirements for SharePoint 2013 Server are quite hefty. Many SharePoint 2013 performance issues have been attributed to lack of resources. Although meeting the minimum performance specs is highly recommended, you can tweak SharePoint 2013 to work with less resources.

The following tips are some that I have collected while looking for ways to improve SharePoint 2013 performance. Some of these will help SharePoint’s performance however, my experience has been that unless you have a server that meets the minimum SharePoint 2013 requirements, the Search function will still bring your SharePoint server to a crawl.

The only way that I have been able to run SharePoint efficiently on a less than ideal server is to completely disable the search feature.

If however, you want to try and tweak SharePoint before completely turning off the search service, be aware that performance results will vary depending on your server’s RAM and CPU speed.

Stop Disable the SharePoint 2013 Search Service

If your SharePoint 2013 is running like a 3 legged turtle, temporarily disable the Search Host Controller and the Search Server. This will render your SharePoint Server usable until you complete these tasks. Note: The SharePoint Timer Service will re-start both the Search Host Controller and the Server Search service, so you may want to temporarily disable the Timer Service as well.

The services to disable are SharePoint Search Host Controller and SharePoint Server Search 15. You can find these services by running services.msc from a command prompt. Once you have finished, don’t forget to enable them again.

Here are the steps to fix SharePoint 2013 performance issues

  • Update SharePoint 2013 March patch update
  • Reduce the search crawl time interval and properly to configure SharePoint 2013 Search
  • Reduce Noderunner’s RAM utilization
  • Clear the search database and re-initialize the SharePoint 2013 search crawler

Update SharePoint with March 2013 Patch Update KB2767999

Updating SharePoint with the March 2013 Patches fixes search-related performance problems. Note that you should disable the SharePoint Timer Service first, then SharePoint Search Host Controller and the SharePoint Server Search before installing the updates. (Detailed instructions here)

· SharePoint Server 2013: http://support.microsoft.com/kb/2767999

· SharePoint Foundation 2013: http://support.microsoft.com/kb/2768000

How to Reduce the Search Feature Crawl Time Interval and Configure SharePoint 2013 Search

By default, the search feature is set to crawl every 20 minutes. This is nice if you have a monster server, but if you are not so lucky, reducing the crawl rate will yield much better performance. If the SharePoint server hosts a large content database, it may take more than 20 minutes to index. By the time the crawler is finished, it’s time to start again! This leaves you with a perpetually crawling indexing function.

To reduce the search index time interval:

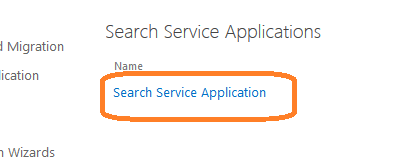
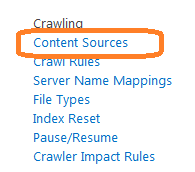
Open Central Administration > General Application Settings > Farm Search Administration

Click on Search Service Application and then on the Content Sources menu link.

1 

2

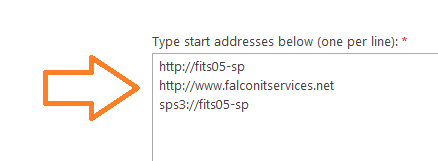
Locate your site, click on the drop down menu and then select edit. In the start address, make sure that you have entries for your FQDN, your default Web as well as the SPS3 Protocol Handler. For example: if your SharePoint server’s NetBIOS name is SP01, then you should have an entry for http://SP01 and SPS3://SP01 in addition to your Web site FQDN. This is necessary for the search feature to properly work. If the search index does not properly work, continual searches will damper performance. Once search is working properly, server performance will greatly increase.

3

Next, set a full and incremental crawl schedule so that the crawl takes place during off-peak usage times. The older your server, the less frequent you may want to make the crawls.

4

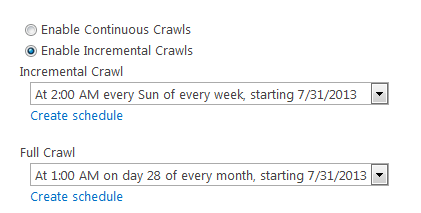
Once you have finished, click OK to save the changes.

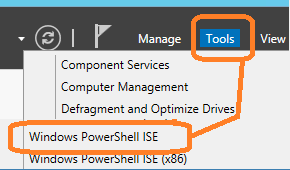
How to Reduce noderunner.exe’s RAM Utilization

On the SharePoint 2013 server, open Server Manager -> Tools -> Windows PowerShell ISE

5

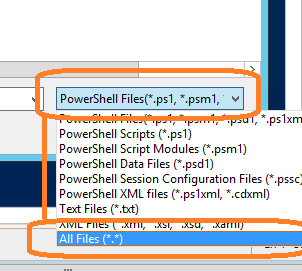
Click File -> Open and navigate to

C:Program FilesMicrosoft Office Servers15.0SearchRuntime1.0

Open noderunner.exe.config

If you cannot see noderunne.exe.config, click on the drop down next to file name and select All Files (.)

6

Modify the following line:


7

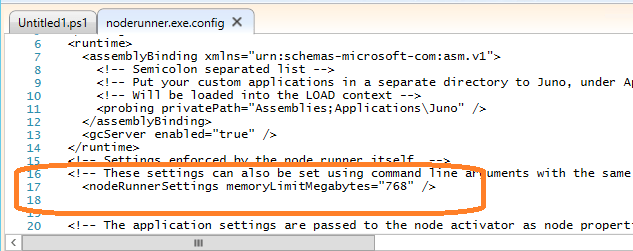
Noderunner.exe is set to “0” by default, which means unlimited memory usage. Change the “0” to a number in megabytes to limit the total amount of ram that it can use.

For example:

Click save and exit. Restart the SharePoint server.

You can greatly increase SharePoint 2013 server performance by stopping the following services:

· SharePoint Search Host Controller

· SharePoint Search Server 15

Of course, this should be done if you are not using the search service. If you are, this may not be an option.

If that’s the case, your best option may be to increase your server’s available RAM to meet or exceed the minimum requirements. You can also mitigate the performance effects caused by the search service if you reduce the amount of Ram available to noderunner.exe however this is less desirable than stopping the search services.

Reset the Search Index and Initialize a Full Crawl

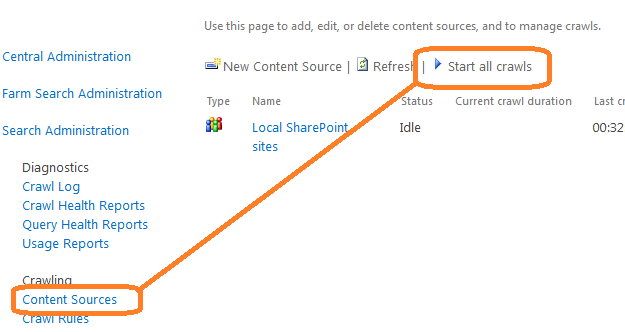
Finally, re-initialize the search index to clear out the database and re-initialize the crawl. To do this, go to Central administration –> General Application Settings –> Farm Search Administration –> Search Service Application. Select Index Reset from the crawling menu and then click on the reset now button.

Once you have reset the index, click on content sources and select start all crawls.

8

Administer search in SharePoint Server 2013

Manage the search schema in SharePoint Server 2013  

Learn how to view, add, edit, map, and delete crawled properties, crawled property categories and managed properties in the search schema.

Manage the Search Center  

Learn about pages that are created in a Search Center site in SharePoint 2013, and see articles about how to configure Web Parts.

Manage search relevance in SharePoint Server 2013  

Learn how you can configure settings to provide the most relevant search results.


Manage crawling in SharePoint Server 2013

  Learn how to crawl content that you want users to be able to search for in SharePoint 2013.
 

Manage the search topology in SharePoint Server 2013

Learn how to manage search components to scale out the search topology in SharePoint 2013.
 

View search diagnostics in SharePoint Server 2013

Learn about search and usage reports, query health reports, crawl health reports and the crawl log to analyze the health of the search system.
 

Enable search alerts in SharePoint Server 2013

Learn how to enable or disable search alerts.
 

Enable query logging in SharePoint Server 2013

Learn how to enable or disable query logging.
 

Export and import customized search configuration settings in Sharepoint Server 2013


Learn how to import and export customized search configuration settings.

Configure properties of the Search Box Web Part

When you create an Enterprise Search Center site collection as described in Create a Search Center site in SharePoint Server 2013, SharePoint 2013 creates a default search home page and a default search results page. In addition, several pages known as search verticals are also created. Search verticals are customized for searching specific content, such as People, Conversations, and Videos, and they display search results that are filtered and formatted for a specific content type or class.

The following pages are created in an Enterprise Search Center site collection:

  • default.aspx: the home page for the Search Center, and the page where end-users enter their queries.
  • results.aspx: the default search results page for the Search Center. It is also the search results page for the Everything search vertical.
  • peopleresults.aspx: the search results page for the People search vertical.
  • conversationresults.aspx: the search results page for the Conversations search vertical.
  • videoresults.aspx: the search results page for the Videos search vertical.
  • advanced.aspx: the search page where end-users can apply some restrictions to their search phrases — for example, limiting the search to an exact phrase.

These pages are located in the Pages library, and they contain Web Parts that you can customize to improve the end-user search experience. This article describes the Web Parts on these pages, and how you can configure the different Web Parts settings to improve how search results are displayed.

By default, the Web Parts on the search vertical pages (results.aspx, peopleresults.aspx, conversationresults.aspx, videoresults.aspx, advanced.aspx) are the same. However the query in the Search Results Web Part is configured differently for each search vertical page. For each search vertical page, the query in the Search Results Web Part is directed to a particular result source. This can be a result source that defines the search vertical or any result source that you want to direct queries to when you create a custom search vertical. For example, for the peopleresults.aspx search vertical page, the query in the Search Results Web Part is limited to the Local People Results (System) result source. For the videoresults.aspx search vertical page, the query in the Search Results Web Part is limited to the Local Video Results (System).

By default, the Search Box Web Part is used on the home page for the Search Center (default.aspx), and all search results pages (results.aspx, peopleresults.aspx, conversationresults.aspx, videoresults.aspx). By changing properties in the Search Box Web Part you can you can do the following:

  • Change the Web Part or page where the search results should be displayed — for example, a custom Search Results Web Part or a custom search results page.
  • Turn off query suggestions and people suggestions. For more information about query suggestions, see Manage query suggestions in SharePoint Server 2013
  • Display links to a search preference page and an advanced search page.
  • Change the display template that is applied to the Web Part.

To configure the properties of a Search Box Web Part      

  1. Verify that the user account that performs this procedure is a member of the Designers SharePoint group on the Enterprise Search Center site.
  2. On the Search Center site home page, click the Settings menu, and then click Edit Page.
  3. In the Web Part, click the Search Box Web Part Menu arrow, and then click Edit Web Part.
  4. In the Web Part tool pane, in the Properties for Search Box section, expand the Which search results page should queries be sent to section, and then do the following:
    • To display the settings that are defined on the Search Settings page, select the Use this site’s Search Settings check box.
    • To override the settings that are defined on the Search Settings page, clear the Use this site’s Search Settings check box, and then do the following:
      • To display search results in a Web Part on the page, in the section Send queries to other Web Parts on this page, select a Web Part.
      • Note:
        If there are no other Web Parts on a page, search results will be sent to the search results page as specified on the Search Settings page.
    • To send queries to a custom search results page, select Send queries to a custom results page URL, and then type the URL of the custom search results page.
    • Note:
      You can’t send queries to a custom search results page that uses a friendly URL.
  5. In the Web Part tool pane, in the Properties for Search Box section, expand the Query Suggestions section, and then do the following:
    • To disable query suggestions, clear the Show suggestions check box.
    • To specify additional properties for query suggestions, change the values in the following fields:
      • Number of query suggestions: How many query suggestions to display.
      • Minimum number of characters: How many characters the user must type before query suggestions are displayed.
      • Suggestions delay (in milliseconds): How many milliseconds elapse before query suggestions are displayed.
      • Number of personal favorites: How many query suggestions are displayed to the user under the text Are you looking for these again? in the search results. These suggestions are based on search results that the user has clicked previously. To disable personal favorite results, clear the Show personal favorite results check box.
    • To turn on people name suggestions, select Show people name suggestions.
  6. In the Web Part tool pane, in the Properties for Search Box section, expand the Settings section, and then do the following:
    • To show a link to a search preference page, select Show preferences link.
    • To show a link to an advanced search page, select Show advanced link, and then in the Advanced search page URL box, type the URL of the advanced search page that you want to link to.
    • To apply another display template, in the Search box control Display Template list, select the display template that you want to apply to the Web Part.
    • Select the Make the search box have focus when the page is loaded check box to make it possible for users to immediately type a query in the search box when the page is loaded without first having to click the search box. By default, this is selected.

Configure properties of the Search Results Web Part in SharePoint Server 2013

Configure properties of the Refinement Web Part in SharePoint Server 2013

Configure properties of the Search Navigation Web Part in SharePoint Server 2013