Migrate SQL Server to another SQL Server (same or new version) sharepoint

This is a step by step guide on how you migrate your SharePoint’s (I used 2010 version in this instance) SQL Server to an new SQL Server host.  In this exercise I tried migrating it in a new version of SQL server which is 2012 from 2008 R2, also had tried it in the same […]

This is a step by step guide on how you migrate your SharePoint’s (I used 2010 version in this instance) SQL Server to an new SQL Server host.  In this exercise I tried migrating it in a new version of SQL server which is 2012 from 2008 R2, also had tried it in the same version.  There are only 9 steps to perform this task but it takes into consideration you already have a new SQL Server provisioned.

Lets start

1. Stop all SharePoint and IIS Related Services

  • SharePoint 2010 Administration
  • SharePoint 2010 Timer
  • SharePoint 2010 Tracing
  • SharePoint 2010 User Code Host
  • SharePoint 2010 VSS Writer
  • SharePoint Foundation Search V4
  • World Wide Web Publishing Service
  • SharePoint Server Search 14
  • Web Analytics Data Processing Service
  • Web Analytics Web Service
Stop SharePoint Admin Service

Stop SharePoint Admin Service

2.Stop IIS

At the command prompt under admin context, type iisreset /stop

3.Detach all related SQL Server databases

  • Configuration database
  • Central Administration content database
  • Content databases
  • Service application databases

i.e.
Bdc_Service_DB_xxxxxxxxxxxxxx
SharePoint_AdminContent_xxxxxxxxxxxxx
SharePoint_Config
WSS_Content
WSS_Logging
WSS_Search_xxxxxxxxxxxxxx

detach database

detach database

4.Move all database files (.mdf, .ldf, and .ndf) to the new server.

Place it in the data folder of the SQL Server instance of the new host.

database files

database files

5.Set up same user permissions on the new SQL server

best way to do this is when you use AD accounts is by scripting the users on the old server and running that script on the new server. If you are not using AD accounts then you will have issues with passwords so best way to do that is to follow this -> http://support.microsoft.com/kb/918992

6.Attach your databases to the new SQL Server

attach database
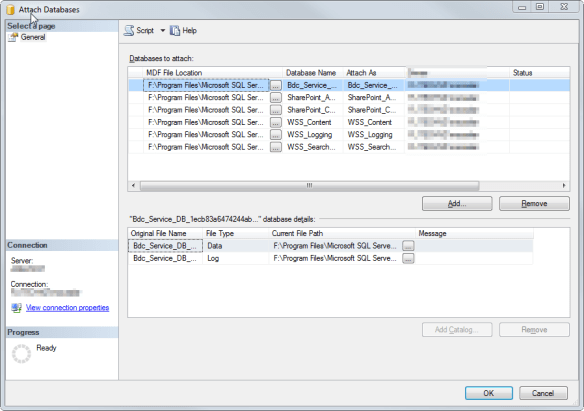
attach database

attach database

attach database

7. Verify what ports your New SQL is using

If it’s using a dynamic port change it to static. To do this go to SQL Server Configuration Manager and into theSQL Server Network Configuration Section choose the instance you will be using. Go to the TCP/IP section and if TCP Dynamic Ports are set to 0 (zero) then remove that and assign a static port into the TCP Port Section on all IP’s. For this sample we will be using 14330 <- notice I just added 0 at the end from the default port. Note that as we will need that on the next section also if you changed the port number from dynamic to static you will need to restart your SQL Server before it can take effect.

port allocation

port allocation

8. Go to your SharePoint server and create your SQL Server Alias

If SQL Configuration Manager is installed just head over to the SQL Native Client 10.0 configuration then intoAliases. Create a new alias that points to your new SQL Server by right clicking on the Alias. You need to do this on both 32 and 64 bit instances.

alias configuration

alias configuration

  • On the Alias name put your old SQL Server IP or Name
  • On the Port the port you indicated on step 7, in this case 14330
  • Protocol should be TCP/IP
  • And on Server the new SQL Server IP or Name together with its instance name if there is any. In our case it’s SQL2012
alias configuration

alias configuration

If you don’t have SQL Configuration Manager in your SharePoint Server then run the CLICONFIG again on both 32 and 64 bit instances. For 32 bit go to run command and execute this “%SystemRoot%/SysWow64/CliConfg.exe” and for 64 just this “CLICONFG” all without quotes of course. Add the same info as above.

alias configuration

alias configuration

9.Start all your SharePoint services, now you have successfully migrated your database.  

  • SharePoint 2010 Administration
  • SharePoint 2010 Timer
  • SharePoint 2010 Tracing
  • SharePoint 2010 User Code Host
  • SharePoint 2010 VSS Writer
  • SharePoint Foundation Search V4
  • World Wide Web Publishing Service
  • SharePoint Server Search 14
  • Web Analytics Data Processing Service
  • Web Analytics Web Service

At the command prompt under admin context, type iisreset /start.

Configuring SQL Server 2014 AlwaysOn Availability Group using PowerShell

Introduction

Earlier on I was trying to search for some scenarios to implement AlwaysOn Availability Groups using PowerShell, although I was able to find some interesting post however non of them represented a complete scenario starting from a fresh windows server installation (using PowerShell), so I decided to write this blog as quick walkthrough thePowerShell scripts needed.

Sample Scenario

In this scenario I will be using a 2 Nodes setup with the following software already installed:

  • Windows Server 2012 R2
  • Both Servers are joined to the domain

Configuration Steps:

To make the scenario simple I be using a Domain Account that has a Local Administrator Permission on both nodes. In addition, all scripts below will be running using PowerShell (Run as Admin) so Lets get started:

1- Install SQL Server

We need to install a standalone setup on each node. I will do that using the below sample unattended SQL Setup Script:

Setup.exe /q /ACTION=Install /FEATURES=SQL /INSTANCENAME=MSSQLSERVER /SQLSVCACCOUNT="<DomainNameUserName>" /SQLSVCPASSWORD="<StrongPassword>" /SQLSYSADMINACCOUNTS="<DomainNameUserName>" /AGTSVCACCOUNT="<DomainNameUserName>" /AGTSVCPASSWORD="<StrongPassword>"   /IACCEPTSQLSERVERLICENSETERMS

2- Add Windows Failover Cluster

We need to install it on each node. I will do that using the below script:

Import-Module ServerManager

Add-WindowsFeature Failover-Clustering –IncludeAllSubFeature

Install-WindowsFeature -Name Failover-Clustering –IncludeManagementTools

3- Configure Windows Failover Cluster

Run the below script on the 1st Node and make sure to update the configuration parameters with your values:

#—————————————————-

Configuration Parameters

#—————————————————-
$Server1 = “Server1”
$Server2 = “Server2”
$IPAddress = “X.X.X.X”
$AlwaysOnClusterName = “ClusetrName”
$QuorumFileSharePath = “\FileSharePath”

#—————————————————-

Create Cluster Service

Create a new cluster ‘AlwaysOnCluster’ with nodes.

#—————————————————-
Import-Module FailoverClusters
New-Cluster –Name $AlwaysOnClusterName –Node $Server1,$Server2 -StaticAddress $IPAddress -NoStorage

Add Quorum

Set-ClusterQuorum -NodeAndFileShareMajority $QuorumFileSharePath

4- Configure AlwaysOn Failover Cluster

Now for the fun part, I have configured the whole AlwaysOn Configuration in one script that needed to be ran on the 1st Node. In addition, I have added the proper comments so take your time to review it  and make sure to update the configuration parameters with your values:

#Set execution policy
Set-ExecutionPolicy unrestricted

Import SQLPS Module

Import-Module “sqlps” -DisableNameChecking

#—————————————————-

Configuration Parameters

#—————————————————-
#Server Names
$Server1 = “Server1”
$Server2 = “Server2”
$ServerInstance1 = ‘$Server1Instance’
$ServerInstance2 = ‘$Server2Instance’

#AlwaysOn TempDB Names
$tmpDB1 = “AG1-TempDB”

#Availability Group Names
$AG1Name=”AG-1″

#Availability Group Listener
$AGListner1Name = “Listener1”
$Listner1IP_Mask = “X.X.X.X/X.X.X.X”
$ListnerPort= “1433”
$FileSharePath = “\FileSharePath”

#Service Accounts
$SQLSVCAccount = “DomainSVCAccount”
$AGDomain = “.contoso.com” #Keep the ‘.’ before domain name

#AlwaysOn EndPoints
$AOEndpointName = “AlwaysOnEndpoint”
$AOPort = “5022”
$AOEncryptionAlgorithm = “AES”

#—————————————————-

Enable AlwaysOn on Servers

#—————————————————-
Enable-SqlAlwaysOn –ServerInstance $Server1
Enable-SqlAlwaysOn –ServerInstance $Server2

#—————————————————-

Create Endpoints

#—————————————————-
#####1st Server
$AOtmpPath = “SQLSERVER:SQL$Server1default”
New-SqlHadrEndpoint -Path $AOtmpPath -Name $AOEndpointName -Port $AOPort -EncryptionAlgorithm $AOEncryptionAlgorithm

start the endpoint

$AOtmpPath = “SQLSERVER:SQL$Server1defaultendpointsAlwaysOnEndpoint”
Set-SqlHadrEndpoint –Path $AOtmpPath –State “Started”;

####2nd Server
$AOtmpPath = “SQLSERVER:SQL$Server2default”
New-SqlHadrEndpoint -Path $AOtmpPath -Name $AOEndpointName -Port $AOPort -EncryptionAlgorithm $AOEncryptionAlgorithm

start the endpoint

$AOtmpPath = “SQLSERVER:SQL$Server2defaultendpointsAlwaysOnEndpoint”
Set-SqlHadrEndpoint –Path $AOtmpPath –State “Started”;

#—————————————————-

Grant Permissions for EndPoints

#—————————————————-
$SQLPermissionQry = ”
USE [master]
GO
CREATE LOGIN $SQLSVCAccount FROM WINDOWS WITH DEFAULT_DATABASE=[master]
GO
GRANT ALTER ANY AVAILABILITY GROUP TO $SQLSVCAccount
GO
GRANT CONNECT SQL TO $SQLSVCAccount
GO
GRANT VIEW SERVER STATE TO $SQLSVCAccount
GO
”

Invoke-Sqlcmd -Query $SQLPermissionQry -ServerInstance $ServerInstance1
Invoke-Sqlcmd -Query $SQLPermissionQry -ServerInstance $ServerInstance2

#—————————————————-
#Create Temp DB for AG
#—————————————————-
$AOtmpPath = “SQLSERVER:SQL$Server1default”
$svr = Get-Item $AOtmpPath
$db1 = New-Object Microsoft.SqlServer.Management.Smo.Database($svr, $tmpDB1);
$db1.Create();

#—————————————————-
#Initial Backup for the DB
#—————————————————-
cd “SQLSERVER:SQL$Server1defaultdatabases”
Backup-SqlDatabase –ServerInstance $Server1 –Database $tmpDB1;

#————————————————

Backup & Restore TempDBs to prepare for AlwaysOn

#————————————————
#Backup
Backup-SqlDatabase –ServerInstance $Server1 –Database $tmpDB1 –BackupFile “$FileSharePath$tmpDB1.bak”;
Backup-SqlDatabase –ServerInstance $Server1 –Database $tmpDB1 –BackupAction Log –BackupFile “$FileSharePath$tmpDB1.trn”;

Restore

cd “SQLSERVER:SQL$Server1default”
Restore-SqlDatabase –ServerInstance $Server2 –Database $tmpDB1 –BackupFile “$FileSharePath$tmpDB1.bak” –NoRecovery;
Restore-SqlDatabase –ServerInstance $Server2 –Database $tmpDB1 –RestoreAction Log –BackupFile “$FileSharePath$tmpDB1.trn” –NoRecovery;

#———————————————
#Create AG Replica
#It assumes SynchronousCommit + Automatic Failover
#———————————————
$PrimaryRepTCP = “TCP://$Server1$AGDomain” + ‘:’ + “$AOPort”
$SecondaryRepTCP = “TCP://$Server2$AGDomain” + ‘:’ + “$AOPort”

$Primary = new-sqlavailabilityreplica -Name $Server1 -EndpointUrl $PrimaryRepTCP -ConnectionModeInPrimaryRole “AllowAllConnections” -ConnectionModeInSecondaryRole “AllowAllConnections” –AvailabilityMode “SynchronousCommit” –FailoverMode “Automatic” -AsTemplate -Version 11;
$Secondary = new-sqlavailabilityreplica -Name $Server2 -EndpointUrl $SecondaryRepTCP -ConnectionModeInSecondaryRole “AllowAllConnections” –AvailabilityMode “SynchronousCommit” –FailoverMode “Automatic” -AsTemplate -Version 11;

#———————————————
#Create a new AG
#———————————————
$ag = New-SqlAvailabilityGroup -Name $AG1Name -AvailabilityReplica ($Primary, $Secondary) -Database $tmpDB1
#———————————————
#Join Availability Replica
#———————————————

$AOtmpPath = “SQLSERVER:SQL$Server2default”
Join-SqlAvailabilityGroup –Path $AOtmpPath –Name $AG1Name;

#———————————————
#Join Replica Database on a Secondary replica
#———————————————
$agpath1 = “SQLSERVER:SQL$Server2defaultAvailabilityGroups$AG1Name”
Add-SqlAvailabilityDatabase –Path $agpath1 –Database $tmpDB1

#———————————————
#Create a Listener using Static IPs
#———————————————
$agpath1 = “SQLSERVER:SQL$Server1defaultAvailabilityGroups$AG1Name”
$ag = Get-Item $agpath1; #Validate AG Path
New-SqlAvailabilityGroupListener -Name $AGListner1Name –Path $agpath1 –StaticIp $Listner1IP_Mask –Port $ListnerPort;

Add SQL Server Availability Group to Exiting Failover Cluster Instance–Part1 of 2

Introduction

Microsoft SQL Server 2012/2014 AlwaysOn provides flexible design choices for selecting an appropriate high availability (HA) and disaster recovery (DR) solution for your application. Building on that fact I will be providing a posts that provides a step-by-step configuration for extending a 2 Node SQL Server Failover Cluster Instance with a 3rd Node that host AlwaysOn Availability Group (This scenario is also known as FCI+AG). For more information about SQL Server 2012 AlwaysOn high availability and disaster recovery design patterns, see SQL Server 2012 AlwaysOn High Availability and Disaster Recovery Design Patterns.

Prerequisites

This posts assumes a basic knowledge of failover cluster instances (FCIs), availability groups, high availability, and disaster recovery concepts. For more information about the full AlwaysOn solution feature set, see the Microsoft SQL Server AlwaysOn Solutions Guide for High Availability and Disaster Recovery white paper.

Scenario

In this scenario I will be using a preconfigured FCI with 2 Nodes, and will be walking through the activities needed for adding a 3rd Node as a DR Server with the following software setup:

  1. Windows Server 2012 R2
  2. All servers are joined to the domain

To make the scenario simple I will be using a Domain Account that has a Local Administrator Permission on All Nodes. In addition, the configuration below will be using a combination of PowerShell Scripts (that will be running as Admin) and GUI so let’s get started:

1. Installing SQL Server on DR Node

We need to install a New Standalone Instance on the DR Node. I will do that using the below sample unattended SQL Setup Script:

Setup.exe /q /ACTION=Install /FEATURES=SQL /INSTANCENAME=MSSQLSERVER /SQLSVCACCOUNT=”” /SQLSVCPASSWORD=”” /SQLSYSADMINACCOUNTS=”” /AGTSVCACCOUNT=”” /AGTSVCPASSWORD=”” /IACCEPTSQLSERVERLICENSETERMS<

2. Installing Windows Failover Cluster on DR Node

Login to the DR Node and run the below script using PowerShell:

Import-Module ServerManager
Add-WindowsFeature Failover-Clustering –IncludeAllSubFeature
Install-WindowsFeature -Name Failover-Clustering –IncludeManagementTools

3. Add DR Node to Existing Windows Failover Cluster

Login to the Active Node on the FCI >> Open “Failover Cluster Manager” and Right click on “Nodes”, Then click on “Add Node”

Click on “Next” in “Add Node Wizard”

User keyboard to Enter server name: in “Add Node Wizard” then click on “Add” in “Add Node Wizard”

Click on “Next” in “Add Node Wizard”

Select “No” for Validating Cluster and Click on “Next” in “Add Node Wizard”

Unselect “Add all eligible storage to the cluster. (check box)” in “Add Node Wizard”

Click on “Next” in “Add Node Wizard”

Make sure that the new node appears in the list of nodes.