Chart Web Part SharePoint 2010

[siteorigin_widget class=”WordAds_Sidebar_Widget”][/siteorigin_widget]
[siteorigin_widget class=”WordAds_Sidebar_Widget”][/siteorigin_widget]

Chart Web Part SharePoint 2010

One of the new additions to Microsoft’s SharePoint Server 2010 platform is the Chart Web Part (CWP), which allows you to create static and dynamic charts for your site without a line a code. One of the complaints from MOSS 2007 was that users wanted to be able to drop a chart onto their site to create dashboard or display information from Excel documents, or provide metrics to other users in a graphical way.

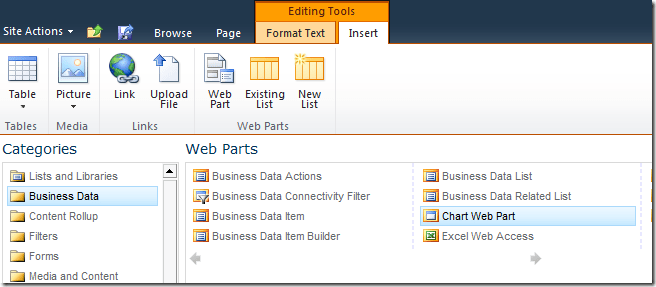
So now that the Chart Web Part is available, let see how we can use it. To drop a Chart Web Part on your page, go to Site Actions > Edit Page. From there, click “Insert” from the Editing Tools menu. The “Chart Web Part” is available under the “Business Data” category, then you can click on the CWP option and add to a content area.

Chart_Web_Part1

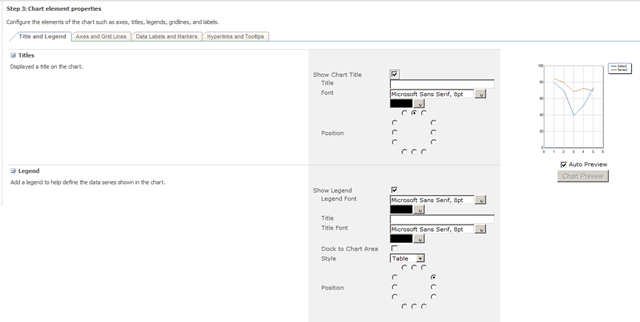
Once added to the page, you will see “Data & Appearance” and “Advance Properties” options.

Chart_Web_Part2

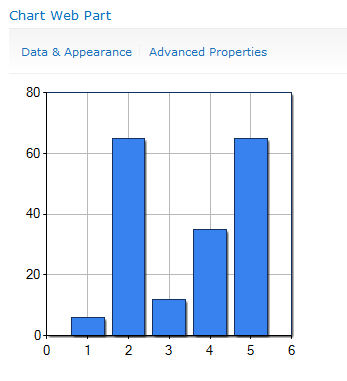
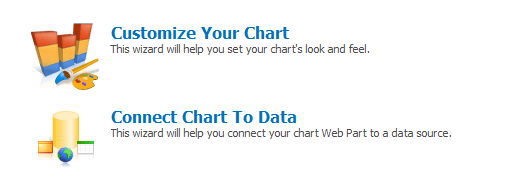
There are a couple of ways you can go once you click the “Data & Appearance” link. You can change the way that the chart will display under “Customize Your Chart” or change the data connection the chart by selecting “Connect Chart to Data” link.

Chart_Web_Part3

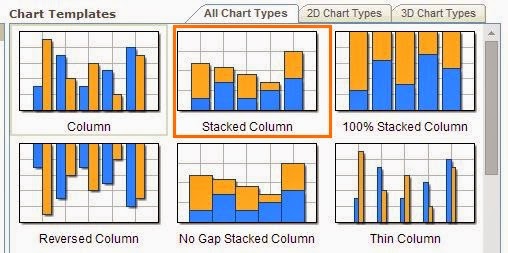
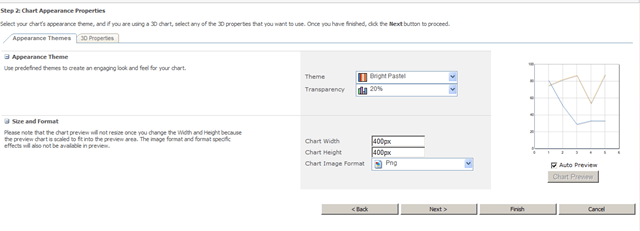
The “Customize Your Chart” options will start with selecting the type of chart you’d like to have display your information. There are 2D and 3D chart types you can select and various sub-types of chart types to choose from.

Chart_Web_Part4

Chart_Web_Part8

Chart_Web_Part9

Then click “Finish” and you have a web part on your page, but now we need to decide which data to use now that we’ve make look the way we want. To change the data source, click “Connect Chart to Data” and we’ll review the options available.

Chart_Web_Part10

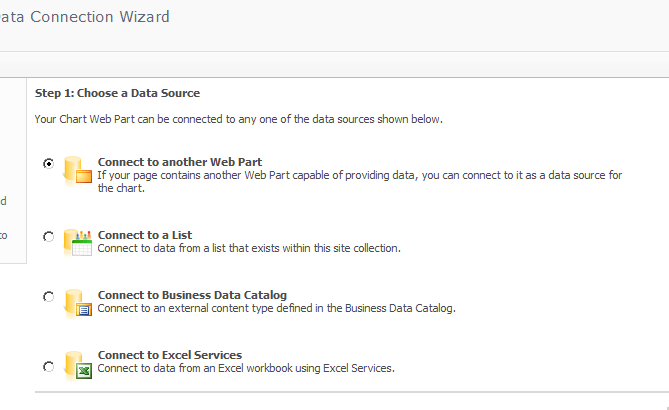
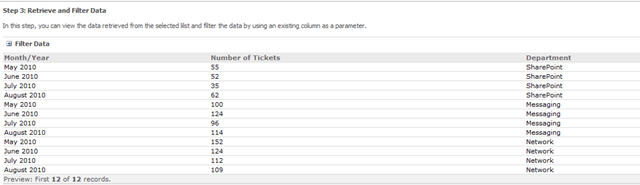
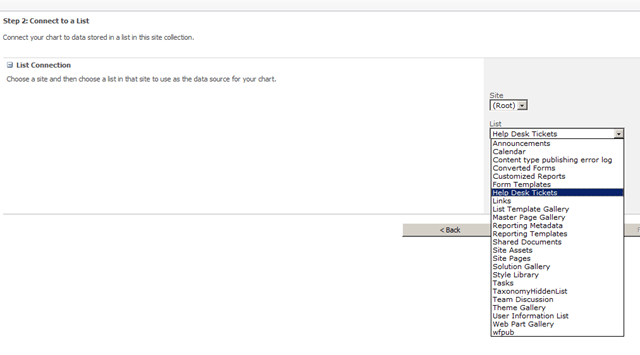
We can connect to another web part that has information that we need, maybe from another SharePoint list. We can connect directly to a list, the Business Data Catalog that contains your business system’s data or to Excel Services that has a spreadsheet you’d like to dynamically update in one location and pull into a dashboard. For this exercise, I will connect to a List, in this case, I’m going to select my “Help Desk Tickets” list.

Chart_Web_Part11


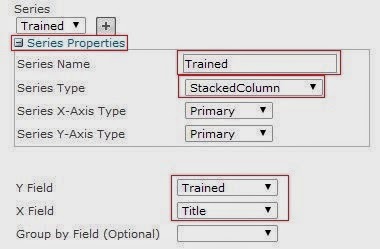
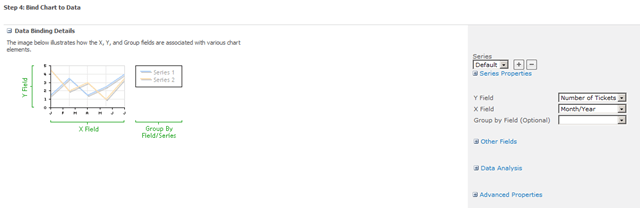
Here is the information that is going to be contained in my chart:

Chart_Web_Part4

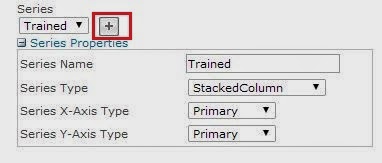
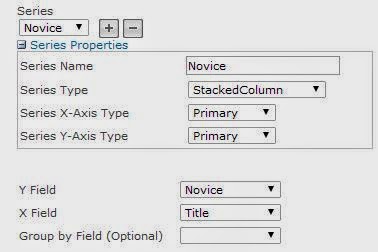
I provide some information to enhance how the chart will display the data and by which fields the data could be grouped by.

Chart_Web_Part5

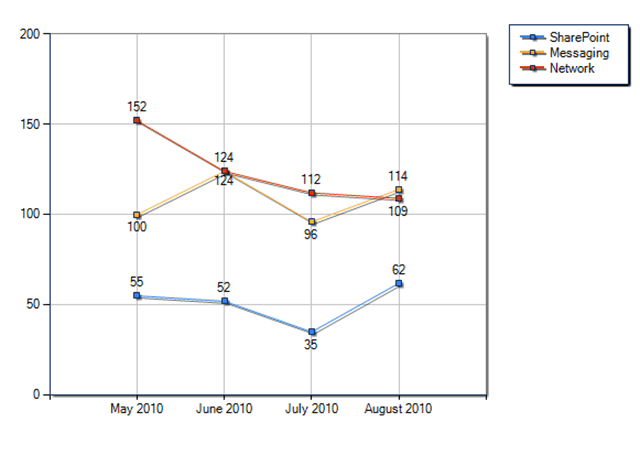
The final result looks like this:

Chart_Web_Part6

You can change some of the properties or styles to get the result you’d like, but you can see it’s pretty easy to add a chart (or charts) to your site with a little configuration. We could look at Excel Services or BDC data in the future, but the concept is the same.

[siteorigin_widget class=”WordAds_Sidebar_Widget”][/siteorigin_widget]
[siteorigin_widget class=”WordAds_Sidebar_Widget”][/siteorigin_widget]

Configure properties of the Search Box Web Part

When you create an Enterprise Search Center site collection as described in Create a Search Center site in SharePoint Server 2013, SharePoint 2013 creates a default search home page and a default search results page. In addition, several pages known as search verticals are also created. Search verticals are customized for searching specific content, such as People, Conversations, and Videos, and they display search results that are filtered and formatted for a specific content type or class.

The following pages are created in an Enterprise Search Center site collection:

  • default.aspx: the home page for the Search Center, and the page where end-users enter their queries.
  • results.aspx: the default search results page for the Search Center. It is also the search results page for the Everything search vertical.
  • peopleresults.aspx: the search results page for the People search vertical.
  • conversationresults.aspx: the search results page for the Conversations search vertical.
  • videoresults.aspx: the search results page for the Videos search vertical.
  • advanced.aspx: the search page where end-users can apply some restrictions to their search phrases — for example, limiting the search to an exact phrase.

These pages are located in the Pages library, and they contain Web Parts that you can customize to improve the end-user search experience. This article describes the Web Parts on these pages, and how you can configure the different Web Parts settings to improve how search results are displayed.

By default, the Web Parts on the search vertical pages (results.aspx, peopleresults.aspx, conversationresults.aspx, videoresults.aspx, advanced.aspx) are the same. However the query in the Search Results Web Part is configured differently for each search vertical page. For each search vertical page, the query in the Search Results Web Part is directed to a particular result source. This can be a result source that defines the search vertical or any result source that you want to direct queries to when you create a custom search vertical. For example, for the peopleresults.aspx search vertical page, the query in the Search Results Web Part is limited to the Local People Results (System) result source. For the videoresults.aspx search vertical page, the query in the Search Results Web Part is limited to the Local Video Results (System).

By default, the Search Box Web Part is used on the home page for the Search Center (default.aspx), and all search results pages (results.aspx, peopleresults.aspx, conversationresults.aspx, videoresults.aspx). By changing properties in the Search Box Web Part you can you can do the following:

  • Change the Web Part or page where the search results should be displayed — for example, a custom Search Results Web Part or a custom search results page.
  • Turn off query suggestions and people suggestions. For more information about query suggestions, see Manage query suggestions in SharePoint Server 2013
  • Display links to a search preference page and an advanced search page.
  • Change the display template that is applied to the Web Part.

To configure the properties of a Search Box Web Part      

  1. Verify that the user account that performs this procedure is a member of the Designers SharePoint group on the Enterprise Search Center site.
  2. On the Search Center site home page, click the Settings menu, and then click Edit Page.
  3. In the Web Part, click the Search Box Web Part Menu arrow, and then click Edit Web Part.
  4. In the Web Part tool pane, in the Properties for Search Box section, expand the Which search results page should queries be sent to section, and then do the following:
    • To display the settings that are defined on the Search Settings page, select the Use this site’s Search Settings check box.
    • To override the settings that are defined on the Search Settings page, clear the Use this site’s Search Settings check box, and then do the following:
      • To display search results in a Web Part on the page, in the section Send queries to other Web Parts on this page, select a Web Part.
      • Note:
        If there are no other Web Parts on a page, search results will be sent to the search results page as specified on the Search Settings page.
    • To send queries to a custom search results page, select Send queries to a custom results page URL, and then type the URL of the custom search results page.
    • Note:
      You can’t send queries to a custom search results page that uses a friendly URL.
  5. In the Web Part tool pane, in the Properties for Search Box section, expand the Query Suggestions section, and then do the following:
    • To disable query suggestions, clear the Show suggestions check box.
    • To specify additional properties for query suggestions, change the values in the following fields:
      • Number of query suggestions: How many query suggestions to display.
      • Minimum number of characters: How many characters the user must type before query suggestions are displayed.
      • Suggestions delay (in milliseconds): How many milliseconds elapse before query suggestions are displayed.
      • Number of personal favorites: How many query suggestions are displayed to the user under the text Are you looking for these again? in the search results. These suggestions are based on search results that the user has clicked previously. To disable personal favorite results, clear the Show personal favorite results check box.
    • To turn on people name suggestions, select Show people name suggestions.
  6. In the Web Part tool pane, in the Properties for Search Box section, expand the Settings section, and then do the following:
    • To show a link to a search preference page, select Show preferences link.
    • To show a link to an advanced search page, select Show advanced link, and then in the Advanced search page URL box, type the URL of the advanced search page that you want to link to.
    • To apply another display template, in the Search box control Display Template list, select the display template that you want to apply to the Web Part.
    • Select the Make the search box have focus when the page is loaded check box to make it possible for users to immediately type a query in the search box when the page is loaded without first having to click the search box. By default, this is selected.

Configure properties of the Search Results Web Part in SharePoint Server 2013

Configure properties of the Refinement Web Part in SharePoint Server 2013

Configure properties of the Search Navigation Web Part in SharePoint Server 2013

Chart webpart SharePoint 2013

In this post we will discuss how to populate SharePoint 2013 Chart webpart from a SharePoint list. Though Microsoft removed chart web part, you can check this work around to make chart web part available in SharePoint 2013.

SharePoint list named “Course” which has 5 columns and the data are like below:

chart web part sharepoint2013

chart web part sharepoint2013


Here I want to show a chart (bar) and want to see in Sharepoint 2013 how many trained, novice, intermediate and expert people. Similarly for SharePoint 2010, Asp.net and C#.Net skills.

For this first add a chart web part to the page (Edit Page -> INSERT -> Web Part). Once you will put the chart it will appear like below. Save the page.

chart web part sharepoint2013

chart web part sharepoint2013


After that click on Data & Appearance. Then select Connect Chart To Data as shown in the fig below:
Connect chart to webpart sharepoint2013

Connect chart to webpart sharepoint2013


In the next step select “Connect to a List” in the Choose a Data Source section. Then click on Next.
connect list chart webpart sharepoint2013

connect list chart webpart sharepoint2013


In the next step select the site and the list in the drop down.

In the next step it will show you the list and the data. Click Next.

The 4th Step Bind Chart to Data is an important step. Follow below instruction. Here

In the Series expand (click on +) Series Properties. Enter name, here I am putting based on my column names. It should be like below:

Series Name: Trained
Series Type: StackedColumn (From the drop down select the column).
Y Field: Trained (Select Trained Column from drop down)
X Field: Title (Remember this will be same for all series)

So it will appear like below:

series properties chart web part sharepoint2013

series properties chart web part sharepoint2013


Then click on the + icon near series like below:
series properties add chart webpart sharepoint2013_6

series properties add chart webpart sharepoint2013_6


Here also fill the series details like below:

Series Name: Novice
Series Type: StackedColumn (From the drop down select the column).
Y Field: Novice (Select Novice Column from drop down)
X Field: Title (Remember this will be same for all series).

So it will be appear like below:

series properties chart webpart sharepoint2013_7

series properties chart webpart sharepoint2013_7


Add all based on the columns. Here I added 4 for each columns (Trained, Novice, Intermediate and Expert).

Then click on Finish.

Now your chat will appear like below:

chart web part sharepoint2013_8

chart web part sharepoint2013_8


If you want to customize a bit like you want to show the count as well as a image in the top right corner follow below steps.

Here click on Data & Appearance, then click on Customize your chat.

Here select Stacked Column and click Next as shown in the fig below:

chart templates

chart templates


You can set the width and Height of the chart web part. then click on Next.

The next step is very important, if you want to Show Legend then you chose Show Legend.

chart web part sharepoint2013_10

chart web part sharepoint2013_10


You can go to the Axis and Gridlines tab and if you do not want the Major Grid lines then you can deselect “Show Major Grid Lines” for both X and Y axis.

If you want to show the Labels then you can select the Label and click on Finish.

chart web part sharepoint2013_11

chart web part sharepoint2013_11


Finally your chart will appear like below:
chart web part sharepoint2013_12

chart web part sharepoint2013_12

[siteorigin_widget class=”WordAds_Sidebar_Widget”][/siteorigin_widget]
[siteorigin_widget class=”WordAds_Sidebar_Widget”][/siteorigin_widget]
[siteorigin_widget class=”N2SS3Widget”][/siteorigin_widget]