This is a step by step guide on how you migrate your SharePoint’s (I used 2010 version in this instance) SQL Server to an new SQL Server host. In this exercise I tried migrating it in a new version of SQL server which is 2012 from 2008 R2, also had tried it in the same […]
This is a step by step guide on how you migrate your SharePoint’s (I used 2010 version in this instance) SQL Server to an new SQL Server host. In this exercise I tried migrating it in a new version of SQL server which is 2012 from 2008 R2, also had tried it in the same version. There are only 9 steps to perform this task but it takes into consideration you already have a new SQL Server provisioned.
Lets start
1. Stop all SharePoint and IIS Related Services
- SharePoint 2010 Administration
- SharePoint 2010 Timer
- SharePoint 2010 Tracing
- SharePoint 2010 User Code Host
- SharePoint 2010 VSS Writer
- SharePoint Foundation Search V4
- World Wide Web Publishing Service
- SharePoint Server Search 14
- Web Analytics Data Processing Service
- Web Analytics Web Service

Stop SharePoint Admin Service
2.Stop IIS
At the command prompt under admin context, type iisreset /stop
3.Detach all related SQL Server databases
- Configuration database
- Central Administration content database
- Content databases
- Service application databases
i.e.
Bdc_Service_DB_xxxxxxxxxxxxxx
SharePoint_AdminContent_xxxxxxxxxxxxx
SharePoint_Config
WSS_Content
WSS_Logging
WSS_Search_xxxxxxxxxxxxxx

detach database
4.Move all database files (.mdf, .ldf, and .ndf) to the new server.
Place it in the data folder of the SQL Server instance of the new host.

database files
5.Set up same user permissions on the new SQL server
best way to do this is when you use AD accounts is by scripting the users on the old server and running that script on the new server. If you are not using AD accounts then you will have issues with passwords so best way to do that is to follow this -> http://support.microsoft.com/kb/918992
6.Attach your databases to the new SQL Server

attach database
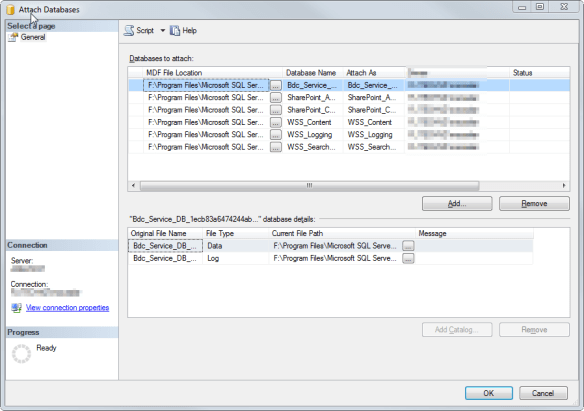
attach database
7. Verify what ports your New SQL is using
If it’s using a dynamic port change it to static. To do this go to SQL Server Configuration Manager and into theSQL Server Network Configuration Section choose the instance you will be using. Go to the TCP/IP section and if TCP Dynamic Ports are set to 0 (zero) then remove that and assign a static port into the TCP Port Section on all IP’s. For this sample we will be using 14330 <- notice I just added 0 at the end from the default port. Note that as we will need that on the next section also if you changed the port number from dynamic to static you will need to restart your SQL Server before it can take effect.

port allocation
8. Go to your SharePoint server and create your SQL Server Alias
If SQL Configuration Manager is installed just head over to the SQL Native Client 10.0 configuration then intoAliases. Create a new alias that points to your new SQL Server by right clicking on the Alias. You need to do this on both 32 and 64 bit instances.

alias configuration
- On the Alias name put your old SQL Server IP or Name
- On the Port the port you indicated on step 7, in this case 14330
- Protocol should be TCP/IP
- And on Server the new SQL Server IP or Name together with its instance name if there is any. In our case it’s SQL2012

alias configuration
If you don’t have SQL Configuration Manager in your SharePoint Server then run the CLICONFIG again on both 32 and 64 bit instances. For 32 bit go to run command and execute this “%SystemRoot%/SysWow64/CliConfg.exe” and for 64 just this “CLICONFG” all without quotes of course. Add the same info as above.

alias configuration
9.Start all your SharePoint services, now you have successfully migrated your database.
- SharePoint 2010 Administration
- SharePoint 2010 Timer
- SharePoint 2010 Tracing
- SharePoint 2010 User Code Host
- SharePoint 2010 VSS Writer
- SharePoint Foundation Search V4
- World Wide Web Publishing Service
- SharePoint Server Search 14
- Web Analytics Data Processing Service
- Web Analytics Web Service
At the command prompt under admin context, type iisreset /start.