Zones are different logical paths expressed as URLs that allow access to the same web application. The default zones in sharepoint is 5. A web application can support up to five Default Zones. The available zone names are Default, Extranet, Intranet, Internet, and Custom.
One particular zone name can be used per web application. Zones using the same name across different web applications typically are available for the same user pool to control access for that group. For instance, your internal employees can use the Intranet zone to access all of the SharePoint sites configured to use that zone, giving that group the same sort of access to all relevant web applications. Each zone is expressed as a separate website in IIS. Zones isolate users based on authentication type, network zone, and policy. All zones have own Port number and Protocol http/https. Different authentication methods can be applied to login different zones like Forms authentication in Intranet and default Windows authentication. we can configure Blob and Distributed cache differently for different zones. When planning for zone deployment, particular attention must be paid to the Default zone, since access to this zone may be gained by anyone who is able to use a link to this zone, such as a URL sent via an automated administrative email. The Default one or any zone used for an outward-facing site must possess a high level of security.
403 forbidden error fix done. Received below error while browsing SharePoint web app.
The website declined to show this webpage
HTTP 403
Most likely causes:
This website requires you to log in
if we create a copy of the web.config file, rename the web.config file, refresh the home page, we receive an “HTTP 404 – Page Not Found” error.
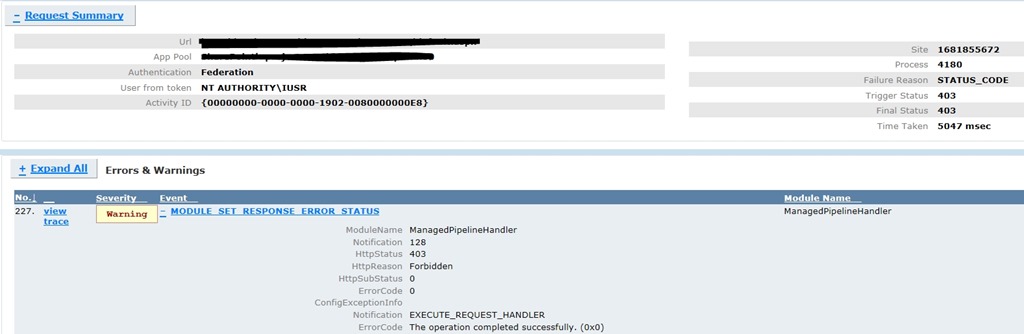
Rename the web.config file back and refresh the page. The site is browse able for a while before failing after some time, We see the following error in Failed Request Tracing.
A procmon trace captured while accessing the web app from the server showed the following:
This issue usually occurs when a request from an authenticated user without local admin rights results in a failed read of the /BIN directory by the impersonating w3wp.exe (IIS worker process for ASP.NET) process.This behavior is typically associated with lack of permissions to the temporary folder /BIN where ASP.Net assemblies are Just In Time (JIT) compiled.
Resolution
The solution is to ensure that the Authenticated Users or \Users group (which usually contains DOMAIN\Users group) has Read & Execute, List Folder Contents and Read permissions on the /BIN folder below
Follow the steps below to grant the required permissions:
Open Windows Explorer and navigate to the /bin directory of your web application
Right-click on the folder and click on Properties
Go to Security tab and click on Edit
Click on Add and add the local server group Authenticated Users or \Users (this usually contains DOMAIN\Users group).
Select the Read & Execute, List Folder Contents and Read permissions (if you are planning to add Everyone to the /bin folder, grant Read permissions only)
Click OK to apply the new settings
Refresh the page and we should be able to browse to the site.
More Information
If an administrator accesses the site/feature that caused the error, the subsequent requests from non-administrators would succeed. This behavior is typically associated with lack of permissions to the temporary folder where ASP.Net assemblies are Just In Time compiled.
The freb trace shows a 403.0 for ManagedPipelineHandler
It seems to go through quite a few ASPNet events – but happens during the ASPNetPageRender – it goes to the ASPNetPageRender Enter, then ASPNetHTTPHandler Leave.Only then does it get a 403.0 which is not an official RFC error. The first sub-status for 403 is 403.0.
Application pool in Classic or Integrated mode
Application Pool in Classic Mode – In this case, we can configure a Wildcard mapping for ASPNET_ISAPI.dll at the website level. That would propagate to child virtual directories. That should not need any further modifications at the virtual directory level.
Application Pool in Integrated Mode – In this case, all relevant virtual directories would need individual modifications. They need to be set for specific handler.
One of the features of SharePoint is the ability for users that need access to a site, and are denied access, through the Request Access process.
To enable or review these settings
Go to Settings | Site Settings | User and Permissions and click on Access Request Settings. In the Access Request Settings dialog box, select the check box next to Allow access requests. Then provide an email address of the individual you would like to manage this feature.
If a site has multiple groups with the same permission levels (Owners, Members and Viewers) but there is not an assigned default group, then you will see the problem where access requests will either not display for the impacted user or an owner will not be able to approve requests.
Windows PowerShell script to change each of the groups for a site so that each is identified as the default group for Members, Owners and Visitors. You will need to a the Microsoft.SharePoint.PowerShell add-in at the top of the script to get the SharePoint references.
If you turn off the feature, you can re-enable the feature by adding an email address to the RequestAccessEmail property. Hope this helps solving the problem around assigning default groups and enabling the Request Access feature in SharePoint 2013.
#Enable Access Requests after it was disabled
$web.RequestAccessEmail = "user@mydomain.com"
$web.Update()