403 forbidden error fix
403 forbidden error fix done. Received below error while browsing SharePoint web app.
The website declined to show this webpage
HTTP 403
Most likely causes:
This website requires you to log in
if we create a copy of the web.config file, rename the web.config file, refresh the home page, we receive an “HTTP 404 – Page Not Found” error.
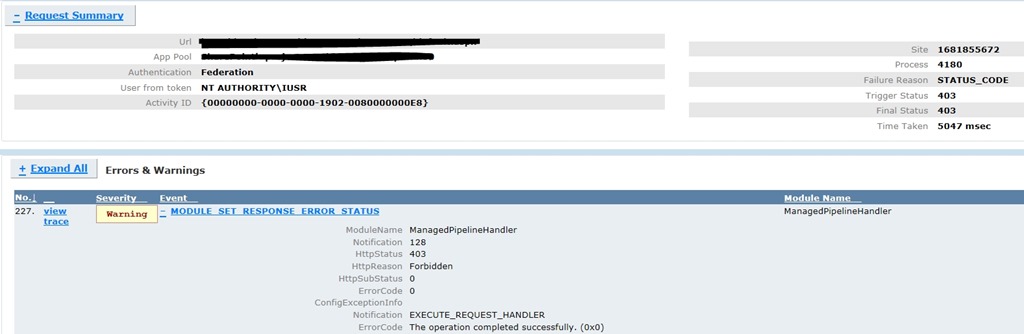
Rename the web.config file back and refresh the page. The site is browse able for a while before failing after some time, We see the following error in Failed Request Tracing.
A procmon trace captured while accessing the web app from the server showed the following:
w3wp.exe 4180 CreateFile
C:\inetpub\wwwroot\wss\VirtualDirectories\Web80.Contoso.com80\bin ACCESS DENIED Desired Access: Read Data/List Directory, Synchronize
Disposition: Open
Options: Directory, Synchronous IO Non-Alert
Attributes: n/a
ShareMode: Read, Write, Delete
AllocationSize: n/a
Impersonating: NT AUTHORITY\IUSR
This issue usually occurs when a request from an authenticated user without local admin rights results in a failed read of the /BIN directory by the impersonating w3wp.exe (IIS worker process for ASP.NET) process.This behavior is typically associated with lack of permissions to the temporary folder /BIN where ASP.Net assemblies are Just In Time (JIT) compiled.
Resolution
The solution is to ensure that the Authenticated Users or \Users group (which usually contains DOMAIN\Users group) has Read & Execute, List Folder Contents and Read permissions on the /BIN folder below
C:\inetpub\wwwroot\wss\VirtualDirectories\{Sitename80}Follow the steps below to grant the required permissions:
- Open Windows Explorer and navigate to the /bin directory of your web application
- Right-click on the folder and click on Properties
- Go to Security tab and click on Edit
- Click on Add and add the local server group Authenticated Users or \Users (this usually contains DOMAIN\Users group).
- Select the Read & Execute, List Folder Contents and Read permissions (if you are planning to add Everyone to the /bin folder, grant Read permissions only)
- Click OK to apply the new settings
- Refresh the page and we should be able to browse to the site.
More Information
If an administrator accesses the site/feature that caused the error, the subsequent requests from non-administrators would succeed. This behavior is typically associated with lack of permissions to the temporary folder where ASP.Net assemblies are Just In Time compiled.
The freb trace shows a 403.0 for ManagedPipelineHandlerIt seems to go through quite a few ASPNet events – but happens during the ASPNetPageRender – it goes to the ASPNetPageRender Enter, then ASPNetHTTPHandler Leave.Only then does it get a 403.0 which is not an official RFC error. The first sub-status for 403 is 403.0.
Application pool in Classic or Integrated mode
Application Pool in Classic Mode – In this case, we can configure a Wildcard mapping for ASPNET_ISAPI.dll at the website level. That would propagate to child virtual directories. That should not need any further modifications at the virtual directory level.
Application Pool in Integrated Mode – In this case, all relevant virtual directories would need individual modifications. They need to be set for specific handler.


