create add a content database in sharepoint 2019

create add a content database is the most common and frequent task in sharepoint 2019 for an administrator. Tasks during sharepoint migration, database upgrade, back up restore of content database, admin follows one of task to add a content database in web application. We can follow manual process of from sharepoint central admin UI method or by using powershell. So in this post will discuss how to create content database.

Advertisements

add a content database in sharepoint using UI method

Follow the step by step procedure to add a content database to web application.

  • Open sharepoint central admin.
  • Click on “Application Management” from left navigation.
  • Click on “Manage content databases” present under “Database”.
manaage content databases in shaarepoint 2019
Advertisements
  • Click on “Add a content database”.
Add a content database in sharepoint 2019
Advertisements
  • Enter “Database Server” name.
  • Enter “Database Name” present under “Database Name and Authentication”.
  • Enter “Number of sites before a warning event is generated”. Once number of sites reached to this number, will send warning mail to admin.
  • Enter “Maximum number of sites that can be created in this database”. This would be the maximum number of site collections can be created. Finally click on “OK”.
database capacity settings database name
Advertisements
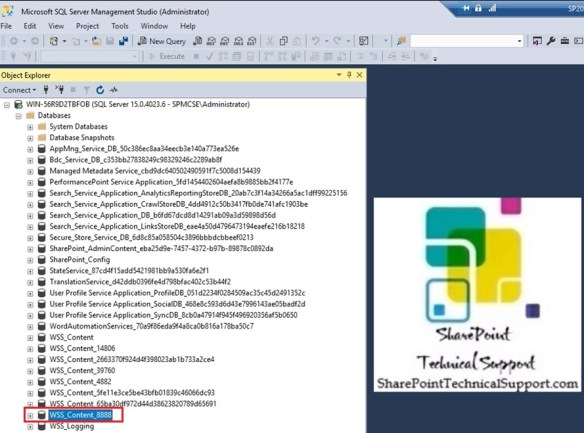
  • Content databse is created and available in sql db server as below.
content database in sql database server
Advertisements
content database added to web application
Advertisements

create content database in sharepoint using powershell

We can use powershell command to add a content database instead of following multiple options from central admin. Run the powershell cmdlet New-SPContentDatabase as below to add a new content database.

New-SPContentDatabase "WSS_Content_9999" -DatabaseServer "WIN-56R9D2TBFOB" -WebApplication http://win-56r9d2tbfob:39760/ -MaxSiteCount 20 -WarningSiteCount 19
adding content database to web application using powershell
Advertisements
Advertisements
Advertisements

export import list library sites in sharepoint

export import list library sites in sharpoint 2019 is a common task for sharepoint administrator carried out during migration. You will get requests from user to move or copy, sharepoint list, libraries, sites from one site to another site. Site may be present in different web application under different sharepoint environment(PROD, DEV, SIT). Site between different sharepoint versions (SharePoint 2010 to SharePoint 2013 or SharePoint 2013 to SharePoint 2016 or SharePoint 2019).

Advertisements

You can migrate contents from one site to another site using backup restore site collection method, if size of content is large. We already discussed how to create backup restore request and follow content database detach attach method in previous post as below.

Advertisements

Dismount Mount content database in sharepoint 2019 using powershell“. You can follow this to complete the task.

You can export list library sites to migrate contents only, size of content to be migrate is not so high. Once export is complete, you need to import list library in destination sharepoint site.

You can export import sharepoint list library using powershell or by using granular backup export a site or list method.

Advertisements

follow the command below Export-SPWeb to export sharepoint site collection

Export-SPWeb -Identity "<site collection url>" -Path "saving path"
Export-SPWeb -Identity "http://win-56r9d2tbfob:39760/sites/SharePointTechnicalSupport" -Path "C:\Backup\Site Collection\sitecollectionPS.cmp"
Advertisements

following command will export subsite in sharepoint

Export-SPWeb -Identity "subsite url" -Path "saving path" -verbose
Export-SPWeb -Identity "http://win-56r9d2tbfob:39760/sites/SharePointTechnicalSupport/SubsiteTeams" -Path "C:\Backup\SubsiteSite\SubsitePS.cmp" -verbose
Advertisements

export list in sharepoint following below command

Export-SPWeb -Identity "subsite url" -Path "saving location" -ItemUrl "list path" -IncludeUserSecurity -IncludeVersions All -verbose
Export-SPWeb -Identity "http://win-56r9d2tbfob:39760/sites/SharePointTechnicalSupport/SubsiteTeams" -Path "C:\Backup\List\List.cmp" -ItemUrl "Lists/ContactList" -IncludeUserSecurity -IncludeVersions All -verbose
Advertisements

following command will export library in sharepoint

Export-SPWeb -Identity "subsite url" -Path "saving location" -ItemUrl "library name" -IncludeUserSecurity -IncludeVersions All -verbose
Export-SPWeb -Identity "http://win-56r9d2tbfob:39760/sites/SharePointTechnicalSupport/SubsiteTeams" -Path "C:\Backup\Library\Documents.cmp" -ItemUrl "Shared Documents" -IncludeUserSecurity -IncludeVersions All -verbose
Advertisements

Import list in sharepoint following below command

Import-SpWeb -Identity "site url in which you want to import list" -Path "exported item saved location" -IncludeUserSecurity -UpdateVersions Overwrite -verbose
Import-SpWeb -Identity "http://win-56r9d2tbfob:19919/sites/SPSupport" -Path "C:\Backup\List\List.cmp" -IncludeUserSecurity -UpdateVersions Overwrite -verbose
Advertisements

following command will import library in sharepoint

Import-SpWeb -Identity "site url in which you want to import library" -Path "exported item saved location" -IncludeUserSecurity -UpdateVersions Overwrite -verbose
Import-SpWeb -Identity "http://win-56r9d2tbfob:19919/sites/SPSupport" -Path "C:\Backup\Library\Documents.cmp" -IncludeUserSecurity -UpdateVersions Overwrite -verbose
Advertisements

similarly use follow the command below to Import site in sharepoint

Import-SpWeb -Identity "http://win-56r9d2tbfob:19919/sites/SPSupport" -Path "C:\Backup\SubsiteSite\SubsitePS.cmp" -IncludeUserSecurity -UpdateVersions Overwrite -verbose
Advertisements

watch below video to get more in detail.

Advertisements

Dismount Mount content database in sharepoint 2019 using powershell

As a sharepoint administrator you must be facing regular tasks to Dismount Mount content database in sharepoint 2019 using powershell. This is most common and frequest task everyone faces.

User requests to restore content database from sharepoint production environment for a particular date and time in UAT environment. In this case we use this content database back up and restore method by help of sql server team. After back and restore completed by sql team, as a sharepoint administrator we need to dismount the content database from web application and mount content database to web application at the destination location UAT.

Advertisements

How to mount content database in sharepoint web application, attach content database, dismount content database, detach content database, backup content database and restore to another content database, move site collection from one site collection to another site collection, content database upgrade from one sharepoint version to another sharepoint version, migrate site collection, back up site in sharepoint and restore in another sharepoint environment, move site collection. All these questions have these below activity as solution.

Request SQL database team to back up and restore with details as below.

Advertisements

Source Environment Production

Source WebApplication : https://Prod-sharepointtechnicalsupport.com
Prod Content database : WSS_Content_39760_Prod
Database Server : MSSQL-PROD
Advertisements

Destination Environement UAT

Destination WebApplication : https://UAT-sharepointtechnicalsupport.com
UAT Content database : WSS_Content_39760_UAT_22may2020   # This will be the name of restored Db
Database Server : MSSQL-UAT
Permission : Permissin maping WSS_Content_46298_2Jan2020 present in same server MSSQL-UAT and farm account "Administrator" should have admin permission in the content database.
Advertisements

As a sharepoint administrator, you need to dismount (Previously there must be some content Db attached in the UAT site for example: WSS_Content_46298_2Jan2020) and mount the restored content database (WSS_Content_39760_UAT_22may2020) in destination environment UAT.

You need to use the commands “Dismount-SPContentDatabase” and “Mount-SPContentDatabase” to finish the task.

Dismount-SPContentDatabase WSS_Content_46298_2Jan2020
Mount-SPContentDatabase "WSS_Content_39760_UAT_22may2020" -DatabaseServer "MSSQL-UAT" -WebApplication https://UAT-sharepointtechnicalsupport.com
Dismount Mount content database in sharepoint 2019
Advertisements

Follow the video below to get detail steps.

Advertisements